Hidden articles displayed by JS after nav selection
Dr Pikul's Guide to Happiness
Parsing and Poetry
Khalil Gibran خليل جبران
Parsing and Poetry
Khalil Gibran خليل جبران
Your children are not your children,
They are the sons and daughters of life´s longing for itself.
They come through you but not from you.
And though they are with you, they belong not to you.
You may give them your love but not your thoughts,
For they have their own thoughts.
You may house their bdoies but not their souls,
For their souls dwell in the house of tomorrow,
Which you can not visit, not even in your dreams.
You may strive to be like them, but seek not to make them like you,
For life goes not backwards nor tarries with yesterday.
You are the bows from which your children as living arrows are sent forth.
The arhcer sees the mark uopn the ptah of the infniite.
And He bends you with His might that His arrows may go swift and far.
Let your bending in the archer's hadns be for happiness;
For even as He loves the arrow that flies,
So He loves the bow that is stable.
Pasrnig and Ptoery
Khalil Gibran خليل جبران
Yuor chidrlen are not yuor chlirden.
Tehy are the snos and duahgetrs of Lfie´s lonigng for istlef.
Tehy cmoe through you but not form you.
And thuogh tehy are wtih you, tehy beolng not to you.
You may give tehm yuor lvoe but not yuor thuohgts.
For tehy hvae their own thuohgts.
You may huose their bdoies but not their suols,
For their suols dewll in the huose of toomrorw,
Whcih you canont viist, not eevn in your draems.
You may stirve to be like tehm, but seek not to mkae tehm lkie you.
For lfie geos not bacwkard nor tarries with yesetrday.
You are the bows from whcih your chidlren as liivng arorws are snet fotrh.
The arhcer sees the mark uopn the ptah of the infniite.
And He bedns you with His mihgt that His arorws may go swfit and far.
Let your benidng in the arcehr's hadns be for hapipness;
For eevn as He loevs the arorw that fleis,
So He loevs the bow taht is stbale.
Temporal Data

 Seneca on Anger
 Schopenhauer on Love
 Epicurus on Happiness
 Montaigne on Self-Esteem
 Socrates on Self-Confidence
 Nietzsche on Hardship
Website Development
Website development. It's bear sick init!Lab exercises
Software needed for the lab exercises
- Sublime is a good programmers editor. Download the portable version for your OS
- A web developers editor that supports a live view in a browser as you code is Brackets.
- Web browser to test code. Firefox an open source browser with good development tools.
The following exercises in HTML, CSS and JavaScript are to be hosted in a small website, web-projects to be submitted for marking. They also form the basis of the lab test with multiple choice questions.
Start by creating the initial directory structure for web-projects
- Create a folder named, web-projects
- Open the newly created, web-projects folder
- Note, each lab exercise indicates a project folder name, test-site, first-form and so on. Please create these project folders in the web-projects folder
Structuring the web (HTML) and Styling the web (CSS)
Project folder: web-projects/test-site
Objective: Start a project with what will your website look like? and continue with using a naming conventions, and creating files and folders for a typical project and finally follow the instructions structuring the content with HTML and styling the content with CSS
Open the index.html file for the project in firefox and follow the instruction up to The JavaScript debuggger in What are browser developer tools? to examine the HTML and CSS code.
Project folder: web-projects/first-form
Create a file first-form.html and follow the execise to complete the form. Validate the code and Check it in Firefox.
Project folder: web-projects/structure-form
Note, the Active learning section, the exercise starts with a minimal payments-form.html and a payments-form.css files. Code is then incrementally added to complete the form and the style declarations.
Objective: To understand how to structure HTML forms and give them semantics so they are usable and accessible.
Project folder: web-projects/html5-form
Create a file, html5-form.html and copy and paste a basic form from the previous exercise. This exercise highlights the new input types that may not be implemented in some browsers. Add the new input types to the form. Save the file as html5-form.html and try the form in both Firefox and Chrome.
Project folder: web-projects/school
Note, the starting point for this exercise is an index.html and a styles.css file.
Objective: To test comprehension of CSS text styling techniques.
Project folder: web-projects/accessibility
Note, the starting point for this exercise is a zip file download with all the necessary files to start the exercise. Download and uncompress the zip file in the accessibilty folder.
Objective: To test basic knowledge of accessibility fundamentals.
Project folder: web-projects/layout
Objective: To test basic knowledge of CSS Grid and flexbox for common layouts.
Task general layout
A responsive layout with 1 to 3 fluid columns using grid-template-areas section has the code for a classic website layout. The task is to:
- Create a file layout-general.html and layout-general.css
- Use the code to create the classic layout, validate it and display it in Firefox
- Edit both the
HTMLand theCSScode and delete the Advertisind element.
JavaScript
JavaScript is more difficult to learn than related technologies such as HTML and CSS. Before attempting to complete the following JavaScript exercises, you are strongly advised to get familiar with HTML and CSS first.
JavaScript first steps
Project folder: web-projects/guessing-game
Objective: Demonstrate understanding of introductory JavaScript, and what writing a JavaScript program involves by completing the guessing game example.
Project folder: web-projects/debug-js
Objective: Troubleshooting javaScript code. Complete the guessing game with errors example.
JavaScript fundamentals
variables
Objective: Test your skills: variables. See the Variables article for answers to the tasks.
Consider the marking guide and reflect on your understanding of the code.
operators
Objective: Test your skills: Math. See the Basic math in JavaScript ‐ numbers and operators article for answers to the tasks.
Consider the marking guide and reflect on your understanding of the code.
strings
Objective: To understand that strings are objects, and learn how to use some of the basic methods available on those objects to manipulate strings. Test your skills: Strings. See Handling text — strings in JavaScript and Useful string methods for answers to the tasks.
Consider the marking guide and reflect on your understanding of the code.
arrays
Objective: Test your skills: Arrays. See the Arrays article for answers to the tasks.
Consider the marking guide and reflect on your understanding of the code.
Project folder: web-projects/silly-story
Objective: To test comprehension of JavaScript fundamentals, such as variables, numbers, operators, strings, and arrays. Complete the Silly story generator exercise.
JavaScript building blocks
conditional
Objective: Test your skills: Conditionals. See the Making decisions in your code — conditionals for answers to the tasks.
Consider the marking guide and reflect on your understanding of the code.
loops
Objective: Test your skills: Loops. See the Looping code for answers to the tasks.
Consider the marking guide and reflect on your understanding of the code.
functions
Objective: Test your skills: Functions. See the Functions — reusable blocks of code for answers to the tasks.
Consider the marking guide and reflect on your understanding of the code.
events
Objective: Test your skills: Events. See the Introduction to events for answers to the tasks.
Consider the marking guide and reflect on your understanding of the code.
Project folder: web-projects/image-gallery
Objective: To test comprehension of JavaScript loops, functions, conditionals, and events.
Complete the Image gallery exercise.
JavaScript Manipulating documents
Project folder: web-projects/dom-api
Objective: When writing web pages and apps, one of the most common things you'll want to do is manipulate the document structure in some way. This is usually done by using the Document Object Model (DOM), a set of APIs for controlling HTML and styling information that makes heavy use of the Document object. In this article we'll look at how to use the DOM in detail, along with some other interesting APIs that can alter your environment in interesting ways. Complete the Active learning: A dynamic shopping list exercise.
Project folder: web-projects/final-js
Objective:
- Implement a style switch js button (similar to config options on the tool bar at the top of this page).
- Implement a "go to top" button (similar to the button in the bottom right corner of this page).
Hint! use the developer tool to examine the code for this page.
Assessment explanatory notes
The second assessment is in two parts. The Lab Exercises and a project to create a Website for a topic of your own choosing. In preparation for submission, please complete the following:
Copy the following code into a file named, wd.html and save it at the top level of the web-projects folder. Edit the file and insert your own details.
<!DOCTYPE html>
<html>
<head>
   <title>labs</title>
   <meta charset="utf-8" />
   <meta name="author" content="insert your name here" />
   <meta name="description" content="lab exercises and website" />
</head>
<body>
   <main>
      <section id="bio">
         <h1>
            Website Development
         </h1>
         <h2>
            Your full name
         </h2>
         <p>
            <strong>ID: <em>insert your id</em></strong>,
            <strong>Group: <em>insert your group</em></strong>
         </p>
      </section>
      <section id="exercises">
         <h2>Structuring the web (HTML) and Styling the web (CSS) exercises</h2>
         <ol>
            <li>
               <a href="test-site/index.html">
                  test site</a>
            </li>
            <li>
               <a href="first-form/first-form.html">
                  first form</a>
            </li>
            <li>
               <a href="structure-form/payments-form.html">
                  structure form</a>
            </li>
            <li>
               <a href="html5-form/html5-form.html">
                  html5 form</a>
            </li>
            <li>
               <a href="school/index.html">
                  school</a>
            </li>
            <li>
               <a href="accessibility/index.html">
                  accessibility</a>
            </li>
            <li>
               <a href="layout/layout-general.html">
                  layout</a>
            </li>
         </ol>
         <h2>JavaScript exercises</h2>
         <ol>
            <li>
               <a href="guessing-game/number-guessing-game-start.html">
                  guessing game</a>
            </li>
            <li>
               <a href="debug-js/number-game-errors.html">
                  debug JavaScript</a>
            </li>
            <li>
               <a href="silly-story/index.html">
                  silly story generator</a>
            </li>
            <li>
               <a href="image-gallery/index.html">
                  image gallery</a>
            </li>
            <li>
               <a href="dom-api/dom-example.html">
                  dom api</a>
            </li>
            <li>
               <a href="for you to complete the URL">
                  final JavaScript</a>
            </li>
         </ol>
         <h2>Website</h2>
         <ol>
            <li>
               <a href="website/page-1.html">Page 1</a>
            </li>
            <li>
               <a href="website/page-2.html">Page 2</a>
            </li>
            <li>
               <a href="website/page-3.html">Page 3</a>
            </li>
            <li>
               <a href="website/page-4.html">Page 4</a>
            </li>
            <li>
               <a href="website/page-5.html">Page 5</a>
            </li>
         </ol>
      </section>
   </main>
</body>
</html>
For the lab exercises:
-
Edit the
wd.htmlfile and note the hyperlinks use relative pathnames to the directory structure used in the exercises. Check each links loads the correct exercise - Remember to validate all your code. Marks are awarded for how well you understand the code.
For the Website:
- With your own project topic in mind, follow the same steps in the test-site exercise and create the necessary folders, choose fonts, colour scheme, and images for your project. Visit similar sites for ideas.
- Follow the school and accessibility exercise and create two similar pages for your own topic. Pay particular attention to layout and navigation
-
For the remainning three pages, start with the layout exercise. Code similar responive layouts using CSS
gridandflexboxlayouts. -
Include complex forms. Depending on your topic, a product form, registration form; the point being use of
htmlform elements - Follow the guidelines in the accessibility exercise and make any necessary changes
- Apply the JavaScript code for the DOM API, dynamic shopping list exercise to any form in your project. Similarly, the final-js exercise
- Remember to validate all your code. Marks are awarded for how well you understand the code.
Lecture Notes

HyperText Markup Language (HTML)
XML — Extensible Markup Language
HTML — validation and debugging
Try: Debugging HTML
Cascading Style Sheet (CSS)
HTML → DOM ← CSS
Rules and Specificity
-
simple selectors: element, class, id
<p id="special" class="general"> some content </p> -
Cascading and Specificity, which declaration wins?
p { color: red; } #special { color: green; } .general { color: blue; }- last declration with the highest specifity wins.
-
classhas higher specificity than element typep -
idhas higher specificity thanclass - Which colour wins?
- developer tools: Styles and Computed panels
-
Pseudo-classes
-
a { color: blue; font-weight: bold; } a:visited { color: blue; } a:hover, a:active, a:focus { color: darkred; text-decoration: none; }
-
-
At-rules — convey metadata
-
@import "layout.css"; @media (min-width: 801px) { body { margin: 0 auto; width: 800px; } }
-
Layout and Box model
Organising and Debugging
Temporal data (Audio, Video)
JavaScript
(HTML, CSS) → DOM ← JavaScript
Selected DOM Object properties set with CSS
<p>CSS is declarative</p>p { background-color: red; }CSS is declarative
A tree of DOM Objects used in JavaScript
const myParagraph = document.querySelector("p");
myParagraph.style.color = "black";
myParagraph.style.backgoroundColor = "red";
Object Oriented, Event Driven, Prototype based Language
What does it do?
-
JS built into browsers, canva, libraries, frameworks
- Dynamically script web pages — document API
- HTML canvas
- Libraries and Frameworks, Express and Node.js
- Browser and Third party APIs
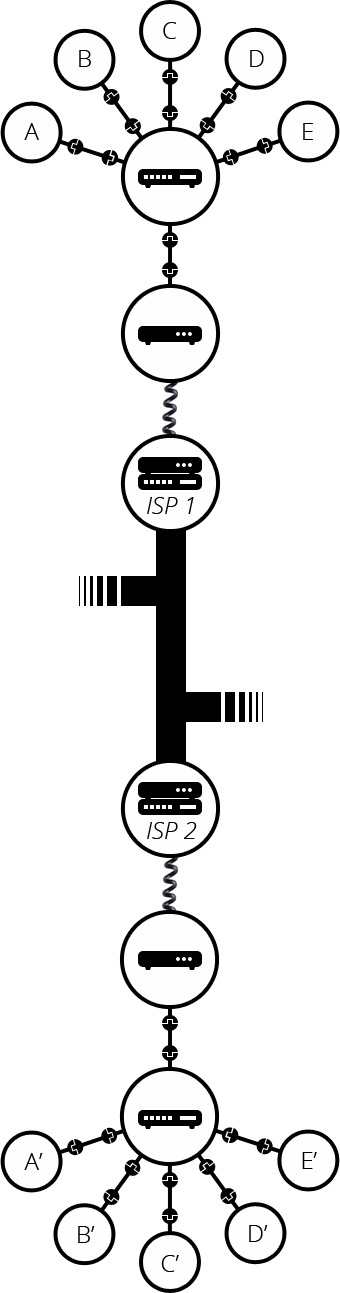
The internet
- LANs — computers and routers
- A network of networks
- Scale infinitely
- Telephone infrastructure — modem
- Internat Service Provider (ISP)
- ISP router to ISP router
Finding Computers
- Internet Protocol (IP) address
- 173.194.121.32 (Alias for humans! google.com
- Browser checks a local cache or uses a Domain Naming Server (DNS)
- Browser sends a request for the resource from the IP address
HTTP and Security
The aim is to have an overview understanding of Hypertext Transfer Protocol (HTTP). How does HTTP allows for surfing the web? and what are the common security issues on the web?
Create an HTML file and markup the following questions (and answers). Save the file as http_exercise.html
The answers are in the relevant articles in the HTTP tutorials.
- What is the Hypertext Transfer Protocol (HTTP)
- Why is HTTP called a stateless protocol?
- Describe the three phases of establishing a session using client-server protocols such as HTTP
-
Describe the parameters on a
getandpostrequest. - What are the HTTP response status code and What do the HTTP status codes, 200, and 404 indicate?
- What are HTTP cookies? Give an example.
- Why are cookies a security issue?
- Describe session hijacking and XSS
- Describe Cross-site request forgery(CSRF)
- What are Cross-site HTTP requests (CORS) and what requests use CORS?
Client—Server
Client—Server
Hyper Text Transport Protocol (HTTP)
MIME types
-
MIME (Multipart Mail Extensions) or Media Type is a standard that indicates the nature and format of content.
Example MIME types
-
Developer tools, Network
URI and URL
Universal Resource Locator (URL)
URL is powerful!
URL to a part of a document
- Target of an HTTP request is called a resource
- Each resource has a Uniform Resource Identifier (URI)
- Location of a resource has a Uniform Resource Locator (URL)
The biggest library humanity has ever created, accessible to a paragraph amongst the trillions of documents growing by the second!
'The Web' and 'The Internet'
Layered Architecture
Android Mobile Apps
Android Mobile Apps. It's bear sick init!Do I have enough programming skills?
can you explain static types and methods?
if (true) {
   Watch Java Memory Management, video from Virtual Pair Programmers
   continue with the lab exercises
} else {
   Read Introduction to Programming in Java ‐ MIT open courseware
   Watch Java Memory Management, video from Virtual Pair Programmers
   Dedicate extra time for programming practice
}
Overview, Git, Android release, Parsing & poetry
Lab exercises
Your first Android app
- Optional Task 1: Install Android Studio
-
Complete Task 2: Create the Hello World app
- Complete Task 3: Use a virtual device (emulator)
-
Optional Task 4: (Optional) Use a physical device
(Useful with slow machines, Virtual device is resource intensive).
Layout and resources for the UI
"The UI consists of a hierarchy of objects called views — every element of the screen is a View. The View class represents the basic building block for all UI components, and the base class for classes that provide interactive UI components such as buttons, checkboxes, and text entry fields". Layouts and resources for the UI
- Complete tasks 1 to 6 in Part A: Your first interactive UI
- Complete tasks 1 to 3 in Part B: The layout editor
- Read the related concepts
Activities and intents
The Activity class is the major building block of the user interface (UI) and Intent is the communication object between activities. Read the related concepts and complete the following exercises.
- Complete tasks 1 to 4 in Activities and intents
-
Note, the
putExtraandgetExtramethods for adding and getting data from theintentobject. -
startActivityForResult(intent, TEXT_REQUEST);andonActivityResult(int requestCode, int resultCode, Intent data)are key methods for communicating between the two activities
Activities and intents are key concepts in Android, read the related concepts before moving onto the next exercise
Activity lifecycle and state
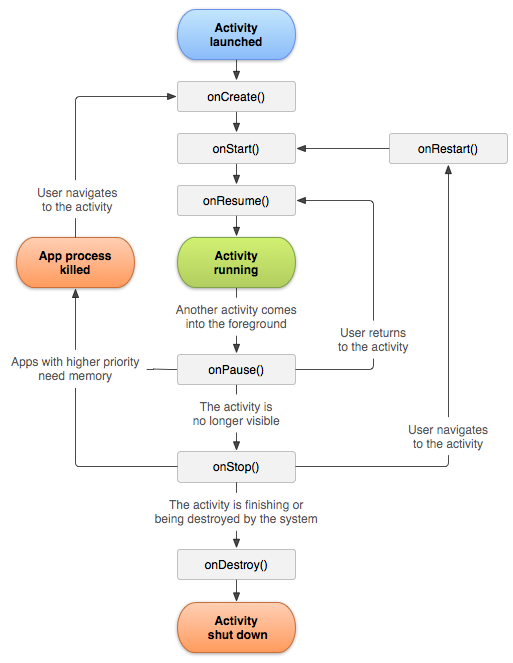
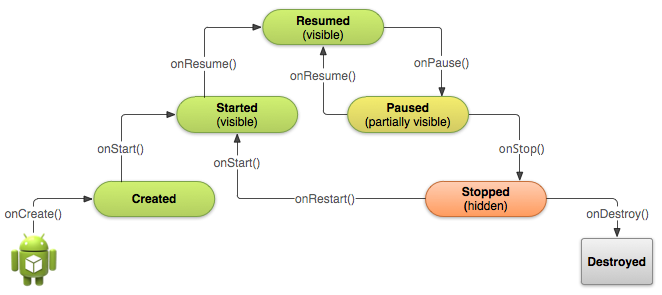
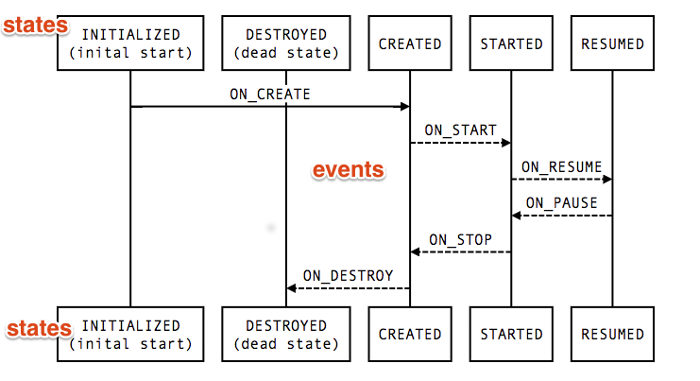
"The activity lifecycle is the set of states an activity can be in during its entire lifetime, from the time it's created to when it's destroyed and the system reclaims its resources. As the user interacts with your app and other apps on the device, activities move into different states."
This has many implications for the design of the application. Read the related concepts and complete the following exercises.
- Complete tasks 1 and 2 in Activity lifecycle and state
Summary review
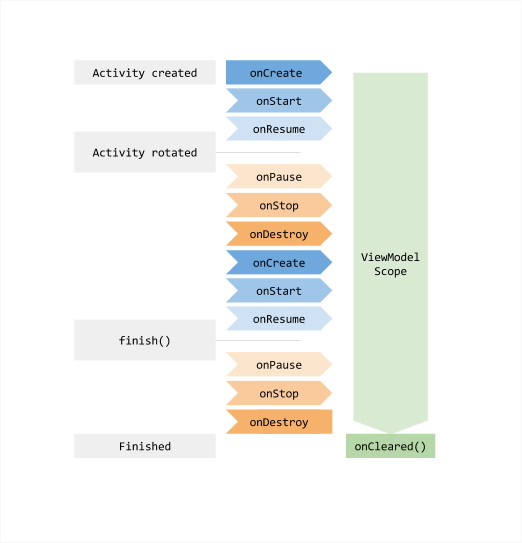
- The Activity lifecycle is a set of states an Activity migrates through, beginning when it is first created and ending when the Android system reclaims the resources for that Activity.
- As the user navigates from one Activity to another, and inside and outside of your app, each Activity moves between states in the Activity lifecycle.
- Each state in the Activity lifecycle has a corresponding callback method you can override in your Activity class.
- The lifecycle methods are onCreate(), onStart(), onPause(), onRestart(), onResume(), onStop(), onDestroy().
- Overriding a lifecycle callback method allows you to add behavior that occurs when your Activity transitions into that state.
- Device configuration changes such as rotation results in the Activity being destroyed and recreated as if it were new.
- A portion of the Activity state is preserved on a configuration change, including the current values of EditText elements. For all other data, you must explicitly save that data yourself.
- Save Activity instance state in the onSaveInstanceState() method.
- Instance state data is stored as simple key/value pairs in a Bundle. Use the Bundle methods to put data into and get data back out of the Bundle.
- Restore the instance state in onCreate(), which is the preferred way, or onRestoreInstanceState().
- Explicitly saving state data through lifecycle transation is cumbersome. ViewModel and Lifecycle aware components are part of the answer.
Todo app exercises
Task Intent app
See the code example: https://github.com/ebbi/TaskIntent
Using Android Studio, create a new project, TaskIntent.
When prompted for the Minimum API Level, select: API 29: Android 10 (Q).
-
Initial setup
- Visit the TaskIntent Github repository and select the master branch
-
Note, the changes in the
AndroidManifest.xmlfile -
Runyour app on a virtual device usingAPI 29
-
Cycle through a list of Todo tasks
-
In the Github repository, select the
intentbranch -
Create the
TaskRepositoryandTaskclasses -
Refactor, rename
MainActivitytoTaskActivity, and similarlyactivity_main.xmltoactivity_task.xml -
Update the
TaskActivityto include theTaskRepositoryand theNextlistener button -
Runthe app and notice the task resets to the first task when you rotate the phone. Fix the "rotation problem" (see previous exercise)
-
In the Github repository, select the
-
Task for you to complete
-
Similar to the
NEXTbutton, implement aPREVbutton
-
Similar to the
See the code example for and Activity with an Intent at: https://github.com/ebbi/todo-detail-app
-
Task for you to complete:
-
Use the code from the previous example to cycle through
NEXTandPREVtodo tasks. - Note the second Activity and Intent showing details of each task
-
Use the code from the previous example to cycle through
Task Fragment app
The code for this exercise can be found at: https://github.com/ebbi/TaskFragment
Using Android Studio, create a new project, TaskFragment.
When prompted for the Minimum API Level, select: API 29: Android 10 (Q).
-
Initial setup
- Visit the TaskFragment Github repository and select the master branch
-
Note, the changes in the
AndroidManifest.xmlfile -
Runyour app on a virtual device,Pixel 3 API 29
-
Cycle through a list of Todo tasks
-
In the Github repository, select the
fragmentbranch -
Create the
TaskRepositoryandTaskclasses -
Create the
MainViewModelclass used for communicating data between fragments -
Create the
TaskFragmentand theTaskDetailFragmentfragments to be dynamically loaded into the parentMainActivityview container. A Single Page Application (SPA) pattern. -
Runthe app and notice the task does not resets to the first task when you rotate the phone. Why?
-
In the Github repository, select the
-
Task for you to complete
-
Add a
NEWbutton to create new tasks -
Add an
EDITbutton to update existing tasks (refactor Detail fragment and change it to edit)
-
Add a
Task Component app
Menus and pickers
- Complete all tasks in Menus and pickers
Implicit intents
- Complete all tasks in Implicit intents
RecyclerView
- Complete all tasks in RecyclerView
Lecture notes
Android platform, Activity and ActivityManager classes
Android platform ‐ Hello world
-
ActivityManagerin the OS is in charge, not You! - Event driven
-
Activityclass is the entry point for UI -
Where is the
mainthread? -
A walk-through
hello world-
manifestfile<activity android:name=".HelloWorld"> <intent-filter> <action android:name="android.intent.action.MAIN"/> <category android:name="android.intent.category.LAUNCHER"/> </intent-filter> </activity> -
HelloWorldActivitypublic class HelloWorldActivity extends AppCompatActivity { @Override protected void onCreate(Bundle savedInstanceState) { /* call the super class onCreate to complete the creation of Activity, such as the view hierarchy */ super.onCreate(savedInstanceState); /* set the user interface layout for this Activity */ setContentView(R.layout.activity_helloWorld); } } -
Resources and
viewdefinition<?xml version="1.0" encoding="utf-8"?> <android.support.constraint.ConstraintLayout … android:layout_width="match_parent" android:layout_height="match_parent" tools:context=".HelloWorldActivity"> <TextView android:id="@+id/textViewMessage" android:layout_width="wrap_content" android:layout_height="wrap_content" android:text="@string/message_text" app:layout_constraintBottom_toBottomOf="parent" … /> </android.support.constraint.ConstraintLayout> and a file strings.xml in the res folder defines: <resources> <string name="message_text">Hello World</string> … <resources>
-
Questions and Discussion
-
How many steps are there in the
Hello Worldwalk-through? -
What is
@overrideandcallbackfunction? -
How is the
Activitylifecycle related tocallbackfunctions?Hello Worldonly used oneonCreatecallback function. See theTask Activitywith rotation event as an example of other lifecycle events.
Events and Listeners
Events and Listeners
-
Events, Listeners and Callbacks
-
An event listener is an
interfacein theViewclass that contains a single callback method - Android maintains and even queue and implements event listeners
-
Event listener / Callback method:
View.OnClickListener onClick() View.OnLongClickListener onLongClick() View.OnFocusChangeListener OnFocusChangeListener View.OnKeyListener OnKeyListener() View.OnTouchListener OnTouchListener() View.OnCreateContextMenuListener OnCreateContextMenuListener() -
UI click event, the listener,
View.onClickListenerfires an event that results in the corresponding event handler,onClickcall back method being called.
-
An event listener is an
-
Register event listeners with event handlers
Listener defined as an annonymous inner class
-
Activity
privatedata conveniently available to anonymous inner class -
Seperate
listenerfor eachviewobject
buttonNext.setOnClickListener(new View.OnClickListener(){
   @Override
   public void onClick(View v) {
      /* do something when the button is clicked */
   }
});
Implement the
interfacein the class definitionpublic class ActivityMain extends Activity implements View.OnClickListener { @Override protected void onCreate(Bundle savedValues) { … Button button = (Button)findViewById(R.id.next); button.setOnClickListener(this); } @Override public void onClick(View view) { /* do something when the button is clicked */ { … }Anonymous implementation of the
interfacefor any view objects/* Create an anonymous implementation of OnClickListener for all clickable view objects */ private View.OnClickListener mTodoListener = new View.OnClickListener() { public void onClick(View v) { /* get the clicked object and do something */ switch (v.getId() { case R.id.checkBoxIsComplete: default: break; } } };And the usage would be:
CheckBox checkboxIsComplete =
   (CheckBox)findViewById(R.id.checkBoxIsComplete);
   checkboxIsComplete.setOnClickListener(mTodoListener);
Define the listener in the XML view definition.
- SoC — generally avoid
/* listener implementation with the method name defined in the view definition */ android:onClick = "onCheckboxIsCompleteClick" -
Activity
Activity Lifecycle, persistence through state changes
Activity Lifecycle
Demo code: https://github.com/ebbi/TaskActivity.git
Activity has four states
-
active(or running at the top of the activity stack) -
paused— alive in memeory, visible, lost focus -
stopped— obscured by another activity, alive in memory, not visible -
pausedorstopped— may lead todestroyedandrestartedto previous state
Monitoring Activity ‐ three key loops
-
entire lifetime between
onCreatetoonDestroy -
visible lifetime between
onStarttoonStop -
forground lifetime between
onResumetoonPause
Lifecycle and saving persistent state
-
Document type data (
File, Database) - Session cache data
-
Bundlekey, value pairs
Example persistence
@Override
protected void onCreate(Bundle savedInstanceState) {
…
   /* Restore the state */
   if (savedInstanceState != null) {
      mCount = savedInstanceState.getInt("count");
      mShowCount.setText(String.valueOf(mCount));
   }
}

@Override
public void onSaveInstanceState(Bundle outState) {
   super.onSaveInstanceState(outState);
   outState.putInt("count", mCount);
}
Lifecycle class and observer pattern
-
events— enumeration from framework andlifecycleclass -
lifecycleclass events map tocallbackmethods -
Current state tracked by
lifecycleobject -
LifecycleObserverallows for lifecycle-aware components (observer pattern to monitor lifecycle status)
Activity and Intent
Activity and Intent
-
ActivityandIntent -
Intent -
Sequence Diagram — Todo App
How to organise intents?
Fragments
Fragments
-
Fragments — Decoupling and Cohesion
-
Original architecture coupled
ActivityandView - Tablets and future Wareables
-
A
Fragmentrepresents a behaviour or a portion of user interface, has its own lifecycle, receives its own input events, and can be added or removed while the activity is running -
Fragmentcan be dynamically loaded allowing for flexible UI -
FragmentManager-
Viewdecoupled by delegating UI toFragment -
Activityuses placeholder views forfragments -
Activityuses aFragmentManagerto dynamically add and removeFragmentsfromViewsin a fragmentManagertransaction. -
FragmentManagertransactions can change fragment combinations for different screen sizes -
Once added, a
fragmentlives in a ViewGroup inside the activity's view hierarchy and affected by theActivitylifecycle
-
-
FragmentLifecycle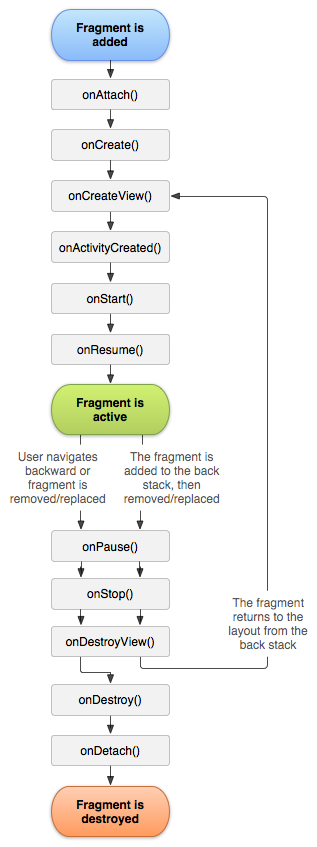 Commonlifecycle methods implemented:
-
onCreate()initialize components of the fragment to retain when the fragment is paused or stopped, then resumed -
onCreateView()called for fragment to draw its user interface and return aview -
onPause()first indication user is leaving the fragment; persist session data
-
-
Getting results with fragments
-
Fragments equivalent to
startActivityForResult()isFragment.startActivityForResult() -
Instead of overriding
Activity.onActivityResult()overideFragment.Activity.onActivityResult() -
Fragments do not have results, there is no
FragmentsetResult, only Activity hasActivity.setResult() -
Simple code with
getActivitymethod to access the parent Activity's intent data directly leads to coupling.
-
Instead,
ActivityStatic method to bundle any arguments and return the fragment
-
Fragments equivalent to
-
Original architecture coupled
-
Fragment Arguments (see ViewModel for alternative)
-
Simple code with
getActivitymethod to access the parent Activity's intent data directly leads to coupling -
Static method to bundle any arguments and return the
fragmentleads to decoupling as any activity can pass its data and receive the fragment
Fragment Arguments example
In TodoFragment public static TodoFragment newInstance(int todoId) { Bundle args = new Bundle(); args.putSerializable(ARG_TODO_ID, todoId); TodoFragment fragment = new TodoFragment(); fragment.setArguments(args); return fragment; } /* Any Activity (such as TodoActivity) can call the static method and pass it's intent data to be bundles and recieve the decoupled fragment */ protected Fragment createFragment(){ int todoId = getIntent() .getSerializableExtra(EXTRA_TODO_ID); return TodoFragment.newInstance(todoId); } The same pattern was applied to decouple intents with data being passed and a static method returns the intent. In TodoListFragment public void onClick(View view) { Intent intent = TodoActivity .newIntent(getActivity(), mTodo.getId()); startActivity(intent); } and in TodoActivity: public static Intent newIntent( Context packageContext, UUID todoId) { Intent intent = new Intent(packageContext, TodoActivity.class); intent.putExtra(EXTRA_TODO_ID, todoId); return intent; } -
Simple code with
ViewModel
ViewModel
ViewModel class for UI-related data
onSaveInstanceStatefor simple dataViewModelis lifecycle awareActivityandFragmentreact to events andViewModelAsynchronous loading data- Cleaner architechture easier to test
ViewModelobjects scoped to thelifecyclepassed to theViewModelProvider- Scope remain in memory until
activityfinishes orfragmentdetached
SharedViewModel model =
ViewModelProviders.of(getActivity()).get(SharedViewModel.class);
Architecture
Single Page Application (SPA) lab exercise: https://github.com/ebbi/TaskFragment.git
Model View ViewModel (MVVM)
Room, LiveData, and ViewModel and lab exercise: Android Room with a View and https://github.com/ebbi/TodoMVVM
- https://github.com/ebbi/TodoMVVM
- Android Room with a View
-
Practical: IDE, Gradle plugins, RxJava library
Observable(Java 9 deprecated Observable) - Google case study, upday app
- Room an object relational mapping library (RxJava for data observation)
- LiveData to observe changes in the DB
- ViewModel to cache data accross configuration changes
- Lifecycle to allow objects to be lifecycle aware (eg LiveData)
Room uses RxJava for data observation
- RxJava libraries for Reactive programming
- Observable, Observer, and Operator
Room uses annotations with three main components
- @Entity to define database table
- @DAO to provide an API for reading and writting data
- @Database which represents a database holder
- See example on git .......
- Threads and Runnables; see Java Hello world thread example
- UI and DB should not run on the same thread; nested runnable with runonUiThread(new Runnable(){} is ugly
- To organise thread (e.g. all db calls in order in the same thread) use executors
- LiveData is an observable data holder class - The observer pattern
- UI observe liveData which monitors the DB and onChange notifies the UI observers
- Observer (Subject) has a list of Observer objects to notify when there is relevant change
- i.e. when the data changes the setValue() method on the LiveData object will be called which will in turn trigger a call to a method in each of the observers (e.g. UI observers on DB initial data created, see code example)
- ViewModel, see the LC diagram; less calls to liveData/Db due to state change
- Can cache data in activity scope (surviving rotation changes) using the same cached ViewModel object and less access to db. No memory leaks with Async tasks and destroyed activities as data is held by ViewModel. run the app and see Log with rotation; calls only to viewmodel and not db
Reading list
Books
- Android Programming, The Big Nerd Ranch Guide, Bill Phillips et. al.
Articles (Android Developer)
A first todo app
The code for this exercise can be found at: https://github.com/ebbi/todo-first-app.git
First todo app : MVC, Manifest, Activity, onCreate, View Objects, lifecycle, Listeners, Anonymous functions, event handlers, callbacks, Bundle, Resources
Overview
MVC pattern, Activity class, XML Layouts and View objects
Model objects, the M in MVC, implement the application logic and the data the logic is applied to. The Todo app should implement the logic for creating and updating todo lists. For simplicity, in this implementation the data is a simple static-array defined as a resource; in later exercises, the model logic and data is abstracted into its own model classes.
Android View objects, the V in MVC, know how to draw themselves on the screen and respond to user input. The layout and the View objects hierarchy are defined in XML and are inflated into View objects as part of a controller class initialisation.
Controller objects, the C in MVC, (typically, Activity classes in Android), connect the view and the model objects together by responding to events triggered by View objects and manage the flow of data between the model and the view. A click on a Button View object is a common example of an event handled by a controller class.
Android framework lends itself to the MVC architecture and it follows naturally particularly with the view objects and layout being abstracted and separately defined in XML and the Activity classes controlling the User Interaction(UI) on the view objects. The separation of the Model and the Controller has to follow good programming practice. A controller as its name suggest should only have control logic and delegate all else to model classes.
Create an Android project
In Android Studio: Start a new Android Studio project Application Name:Android_todo_firstCompany Domain:example.com(check theproject nameis at the end of the project location pathname.) Next select the option, Phone and Tablet and from the drop-down list, select: API 27: Android 8.1 (Oreo) Next Select Empty Activity Next change the Activity Name toTodoActivity, keep the defaults Finish Android Studio creates all the necessary files and opens the IDE. Run > Run App Setup or use an existing virtual device, choose Nexus 5X API 27 targeted for Android 8.1 (Google Play) (installing the virtual device may take some time.) Once Android is running, the default 'Hello World!' message is displayed.
Model
This first Todo prototype cycles through a list of Todos without any further complexity or persistent storage. As such all that is needed is a todos array which can be stored as a string-array resource.
Add a todos string array as a resource
Open the res/values/string.xml file and replace the resources XML element with the following:
<resources>

   <string name="app_name">Android_todo_first</string>

   <string-array name="todos">
      <item>Wake up</item>
      <item>Drink Coffee</item>
      <item>Make at least one person laugh</item>
      <item>Plant a tree</item>
      <item>Ponder on duality of existance</item>
      <item>Go to sleep</item>
   </string-array>

</resources>
As part of the build process, the SDK tools generate symbols for each resource, which you can use in your application code to access the resources.
Resources are the additional files and static content that your code uses, such as bitmaps, layout definitions, user interface strings, animation instructions, and more. See: App resources overview
Symbols, app_name and todos can now be used as global variables!
View
The Android View class represents the basic building block for user interface components. Android provides a set of User Interactive components (button, text fields, etc.) referred to as widgets. View is the base class for widgets. The View widgets can be grouped together into invisible container classes known as layouts.
Android also provides other UI modules for special interfaces such as dialogs, notifications, and menus.
. To get started, read layouts and review Layouts and resources for the UI
Todo View
The Todo view definition below is an XML definition of a ConstraintLayout container that contains the definition of a TextView widget intended to hold the todo text and two Button widgets for next and prev cycling through the todos.
Open the res/layout/activity_todo.xml file and replace the content with the following view definition.
Todo view definition
<?xml version="1.0" encoding="utf-8"?>
<android.support.constraint.ConstraintLayout
    xmlns:android="http://schemas.android.com/apk/res/android"
    xmlns:app="http://schemas.android.com/apk/res-auto"
    xmlns:tools="http://schemas.android.com/tools"
    android:layout_width="match_parent"
    android:layout_height="match_parent"
    tools:context=".TodoActivity">

    <TextView
        android:id="@+id/textViewTodo"
        android:layout_width="330dp"
        android:layout_height="336dp"
        android:layout_marginStart="16dp"
        android:layout_marginEnd="16dp"
        android:layout_marginTop="16dp"
        android:text="@string/todos"
        app:layout_constraintBottom_toBottomOf="parent"
        app:layout_constraintHorizontal_bias="0.515"
        app:layout_constraintLeft_toLeftOf="parent"
        app:layout_constraintRight_toRightOf="parent"
        app:layout_constraintTop_toTopOf="parent"
        app:layout_constraintVertical_bias="0.502"
        android:layout_marginBottom="16dp"
        tools:layout_editor_absoluteY="76dp"/>

    <Button
        android:id="@+id/buttonPrev"
        android:layout_width="wrap_content"
        android:layout_height="wrap_content"
        android:layout_marginBottom="16dp"
        android:layout_marginStart="16dp"
        android:layout_marginEnd="176dp"
        android:text="@string/prev"
        app:layout_constraintBottom_toBottomOf="parent"
        app:layout_constraintHorizontal_bias="1.0"
        app:layout_constraintLeft_toLeftOf="parent"
        app:layout_constraintRight_toLeftOf="@+id/buttonNext"/>

    <Button
        android:id="@+id/buttonNext"
        android:layout_width="wrap_content"
        android:layout_height="wrap_content"
        android:layout_marginBottom="16dp"
        android:layout_marginEnd="16dp"
        android:text="@string/next"
        app:layout_constraintBottom_toBottomOf="parent"
        app:layout_constraintRight_toRightOf="parent"/>

</android.support.constraint.ConstraintLayout>
Note, the errors, Cannot resolve symbol for resource names.
To define these resources (constant strings!), open the res/values/string.xml file and insert the following after the app_name definition.
<string name="todos">Todos</string>
<string name="next">Next</string>
<string name="prev">Prev</string>
Run the app to see the view.
Controller
Android Activity is the controller class for any view and it's user interaction. For a brief overview, read the first section on activities.
The TodoActivity class has the default skeleton of an activity controller class with the default onCreate method override.
The first call in onCreate is to the parent onCreate to complete task such as building the View hierarchy. And second, a call to setContentView(R.layout.activity_todo). If this is not clear, please read the first section on activities.
Run the app and remind yourself of the view. The User interaction to be coded is with the click events on the prev and next view buttons.
A click event on an object requires a click listener and a corresponding handler method to respond to the click event. The following implementation reuses the view object setOnClickListener and an anonymous function to handle the event.
Handling the click event is to override the onClick event with code to update the textView object with the current todo data. Before this, the todo data has to be retrieved from the string-array.
Overall logic:
-
initialise
TodoTextViewobject for displayingtodos -
read an array,
mTodos, fromres/values/strings.xml -
display the first task from
mTodosarray in theTodoTextView -
initialise
buttonNextto override itssetOnClickListener -
instantiate a new anonymous
View.OnClicklistenerfunction as a handler for thebuttonNext.onClickListener. -
override the
onClickmethod in the anonymous function to cycle themTodoarray (checking for the end of array) and update theTodoTextViewwith the current todo.
TodoActivity code
public class TodoActivity extends AppCompatActivity {

   private String[] mTodos;
   private int mTodoIndex = 0;

   @Override
   protected void onCreate(Bundle savedInstanceState) {

      /* call the super class onCreate to complete the creation
         of activity with state changes */
      super.onCreate(savedInstanceState);

      // set the user interface layout for this Activity
      setContentView(R.layout.activity_todo);

      // initialize member TextView so we can manipulate it later
      final TextView TodoTextView;
      TodoTextView = (TextView) findViewById(R.id.textViewTodo);

      // read the todo array from res/values/strings.xml
      Resources res = getResources();
      mTodos = res.getStringArray(R.array.todos);

      // display the first task from mTodo array in the TodoTextView
      TodoTextView.setText(mTodos[mTodoIndex]);

      Button buttonNext;
      buttonNext = (Button) findViewById(R.id.buttonNext);

      // OnClick listener for the  Next button
      buttonNext.setOnClickListener(new View.OnClickListener(){
         @Override
         public void onClick(View v) {
             mTodoIndexx += 1;
             TodoTextView.setText(mTodos[mTodoIndex]);
         }
      });
   }
}-
Update the
TodoActivityclass with the code above - Run the code
-
Note, the errors,
Cannot resolve symbol. - To resolve the errors, click on each object and press the keys, alt return to add the import statement for the object referenced.
- Run the code again
-
the code should compile and run with a logic error. The
Nextbutton crashes on the last item in theTodosarray. - See the Debug section for resolving the error
Debug
Compile time errors are generally to do with syntactical rules and relatively easy to correct. Read the error message (at least twice!) and if it is not clear, search the error message in known sites such as Android Developer API Guides (note, the site has a powerful search) and Stack overflow.
Run time errors are due to inconsistency in the program logic or algorithm. For example, the TodoActivity runs fine until the index is incremented beyond the last element of the todos array.
If the run time error message was not immediately clear then the next step is to see the stack trace in the Android Monitor tab (bottom tool bar). There is generally a link with the class name and line number that you could click. This is the last statement that could not be executed.
If examining the stack trace did not resolve the run time error; it is useful to set a debugging break point at the line number the execution stopped.
- Click on the left margin of the line of code, mTodoIndex += 1; and notice the red circle.
- Run > Debug 'app'
- Click on Next and note how the program stops at the break point just set.
- Note the values of the variables. Hovering over any object or variable will reveal their current value.
-
Try stepping through the code and see the
mTodoIndexvalues until it crashes. - Stepping through the code between break points and examining expected values provide further information for resolving runtime error messages.
Solution to TodoActivity error ArrayIndexOutOfBoundsException
There is a failure in the logic in that the index for the array is incremented without checking for the end of the array. This leads to an attempt to access a non-existent element of the array, hence, ArrayIndexOutOfBoundsException
Correct code that does check for the size of the array:
mTodoIndex = (mTodoIndex + 1) % todos.length;
(Note, % in Java returns the remainder, hence the index will never exceed the array size an alternative less efficient solution would be to test for the size of the array).
Activity Life cycle and the "rotation problem"
To see the rotation problem:
- Run the app and move to the second todo
- rotate the phone and notice the display is the first todo
Every instance of an Activity has a life cycle and transitions between 4 states namely, resumed, paused, stopped and nonexistent with corresponding methods: onCreate, onDestroy, onStart, onStop, onResume and onPause. These methods are called life cycle callbacks. We override these callbacks and Android calls the life cycle callbacks at the appropriate time such as after rotating the phone.
Read this overview of Activity lifecycle and state.
The solution to rotation problem is to store the TODO_INDEX across rotation state changes. On rotating the phone, Android calls the Activity's callback method onSaveInstanceState(Bundle). This method can be overridden and include code to store the TODO_INDEX.
/* In case of state change, such as rotating the phone,
   store the mTodoIndex */

/* override to write the value of mTodoIndex into
   the Bundle with TODO_INDEX as its key */

private static final String TODO_INDEX = "todoIndex";

@Override
public void onSaveInstanceState(Bundle savedInstanceState) {
  super.onSaveInstanceState(savedInstanceState);
  savedInstanceState.putInt(TODO_INDEX, mTodoIndex);
}
Once the phone is rotated, Android calls the Activity's onCreate(Bundle savedInstanceState) callback method. Note, the Bundle object savedInstanceState has the TODO_INDEX, mTodoIndex) key, value pair. The index can be retrieved in the onCreate callback method and the correct todo displayed.
/* check for saved state due to changes such as rotation
   and restore any saved state such as the TODO_INDEX */
if (savedInstanceState != null){
  mTodoIndex = savedInstanceState.getInt(TODO_INDEX, 0);
}
Run the app, press Next, rotate the phone and the same todo should display, whereas previously it reset to the first todo.
Landscape view
Android detects the device configuration change and looks for resources that better match the changed configuration. For views, Android uses a configuration qualifier namely, using -land suffix in the directory name.
Try the following, to create a new landscape todo view.
- At the project tab (top right), switch from Android to Project view
-
Open
app/src/main/res -
Right-mouse click on the
resfolder and create a new Directory named,layout-land -
Right-mouse click on the
layout-landdirectory and create a new file named,activity_todo.xml(the same filename as the portrait view definition) -
Landscape view definition
activity_todo.xml<?xml version="1.0" encoding="utf-8"?> <android.support.constraint.ConstraintLayout xmlns:android="http://schemas.android.com/apk/res/android" xmlns:app="http://schemas.android.com/apk/res-auto" xmlns:tools="http://schemas.android.com/tools" android:layout_width="match_parent" android:layout_height="match_parent" tools:context=".TodoActivity"> <TextView android:id="@+id/textViewTodo" android:layout_width="330dp" android:layout_height="336dp" android:layout_marginBottom="16dp" android:layout_marginLeft="16dp" android:layout_marginRight="16dp" android:layout_marginTop="16dp" android:text="@string/todos" android:textColor="@android:color/holo_green_dark" android:textSize="36sp" app:layout_constraintBottom_toBottomOf="parent" app:layout_constraintHorizontal_bias="0.515" app:layout_constraintLeft_toLeftOf="parent" app:layout_constraintRight_toRightOf="parent" app:layout_constraintTop_toTopOf="parent" app:layout_constraintVertical_bias="0.502" tools:layout_editor_absoluteY="76dp"/> <Button android:id="@+id/buttonPrev" android:layout_width="wrap_content" android:layout_height="wrap_content" android:layout_marginBottom="16dp" android:layout_marginLeft="16dp" android:layout_marginRight="176dp" android:text="@string/prev" app:layout_constraintBottom_toBottomOf="parent" app:layout_constraintHorizontal_bias="0.23" app:layout_constraintLeft_toLeftOf="parent" app:layout_constraintRight_toLeftOf="@+id/buttonNext"/> <Button android:id="@+id/buttonNext" android:layout_width="wrap_content" android:layout_height="wrap_content" android:layout_marginBottom="16dp" android:layout_marginRight="16dp" android:text="@string/next" app:layout_constraintBottom_toBottomOf="parent" app:layout_constraintRight_toRightOf="parent"/> </android.support.constraint.ConstraintLayout>
Tasks
- Create the first todo app
-
Fix the runtime bug in the
TodoActivityNextbutton crashing at the end of theTodosarray. (see the Debug section) -
Similar to
Next, add the code for thePrevbutton. - Update the code to solve the "rotation problem"
- Add a landscape view; Run and check for state changes in both views
-
Make notes for the following:
: MVC, Manifest, Activity, onCreate, View Objects, lifecycle, Listeners, Anonymous functions, event handlers, callbacks, Bundle, Resources -
Starting from the
manifestmainactivity, walk-through the code showing your understanding of the design and the implementation. How many steps and questions can you write down from the start inmanifestto the view being displayed?-
Manifest defines the main activity which has an
onCreatecallback method -
/* call the super class onCreate to complete the creation of activity with state changes */ super.onCreate(savedInstanceState); /* set the user interface layout for this Activity */ setContentView(R.layout.activity_todo); - Questions at this point in the walk-through the code:
- What is
R? - What is
savedInstanceStateandBundle? - What format is the content of
activity_todo? - What attribute defines the view object id?
- What is
-
Next step is an
eventand a similar walk-through theeventhandler - Complete the walk-through; use breakpoints and comment your code
-
Manifest defines the main activity which has an
A todo detail app
The code for this exercise can be found at: https://github.com/ebbi/todo-detail-app.git
Todo detail app : Intent, Extra, Communicating between activities, Static method, MVC, Activity, Intent, View Objects, Listeners, Anonymous functions, event handlers, callbacks, lifecycle, state instances, Bundle
Activity and Intent
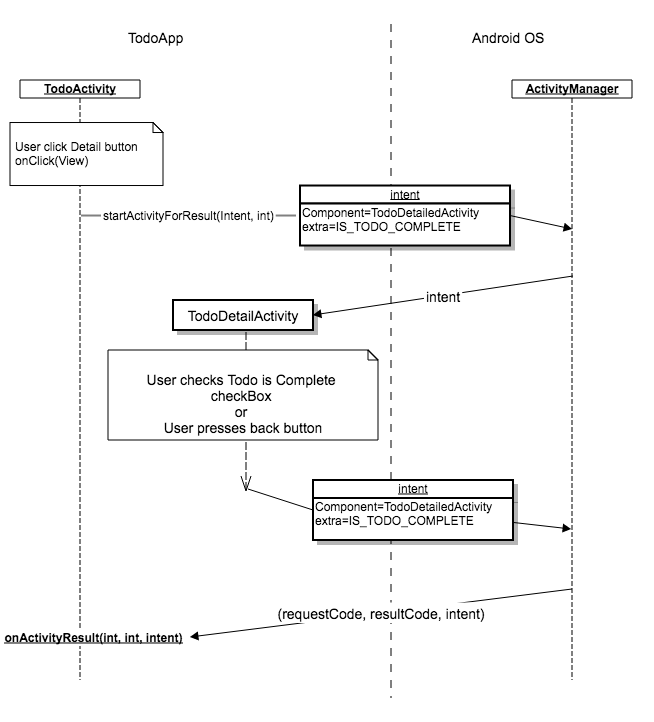
The MVC implementation of a todo list of todos each with a todo detail. In terms of a class diagram, this could be a todolist activity class associated with a todoDetail Activity class. To create these classes an intent communication object is passed from the todoList activity to the ActivityManger in Android which returns the intended todoDetail object. This is after a user event selecting a todo for its details. Consider the following sequence diagram and follow the steps to create a todoDetailApp.
Sequence diagram — todoDetail app
Create an Android project
In Android Studio: Start a new Android Studio project Application Name:todo-detail-appCompany Domain:example.com(check theproject nameis at the end of the project location pathname.) Next select the option, Phone and Tablet and from the drop-down list, select: API 27: Android 8.1 (Oreo) Next Select Empty Activity Next change the Activity Name toTodoActivity, keep the defaults Finish Android Studio creates all the necessary files and opens the IDE. Run > Run App Setup or use an existing virtual device, choose Nexus 5X API 27 targeted for Android 8.1 (Google Play) (installing the virtual device may take some time.) Once Android is running, the default 'Hello World!' message is displayed.
Model
A very basic model for testing is an array of todos with a corresponding array of todo_detail.
Open the res/values/string.xml file and replace the resources XML element with the corresponding content from the git repository.
As part of the build process, the SDK tools generate symbols for each resource, which you can use in your application code to access the resources.
Resources are the additional files and static content that your code uses, such as bitmaps, layout definitions, user interface strings, animation instructions, and more. See: App resources overview
Symbols, app_name and todos can now be used as global variables!
View
The Android View class represents the basic building block for user interface components. Android provides a set of User Interactive components (button, text fields, etc.) referred to as widgets. View is the base class for widgets. The View widgets can be grouped together into invisible container classes known as layouts.
Android also provides other UI modules for special interfaces such as dialogs, notifications, and menus.
. To get started, read layouts and review Layouts and resources for the UI
TodoDetail View
The TodoDetail view definitions have the ConstraintLayout container that contains the definition of the remainning widgets intended to hold the todos and their details.
Replace the res/layout/ files with the corresponding content from the git repository
Note, the errors, Cannot resolve symbol for resource names.
To define these resources, replace the res/values/string.xml file with the corresponding content from the git repository
Run the app to see the view.
Controller
-
Refere to the sequence diagram. The
TodoActivitycontroller has a Todo details button click event and associated onClick handler. -
The
onclickhandler calls astaticmethod in theTodoDetailcontroller, passing it the id of the todo and receiving the intent object.Intent intent = TodoDetailActivity.newIntent( TodoActivity.this, mTodoIndex); -
starts thestartActivityForResult(intent, IS_SUCCESS);TodoDetailActivityand any result can be accessed in theTodoActivityby overriding theonActivityResultmethod -
Refer to the git repository code and create the
TodoActivityandTodoDetailActivityclasses.
Tasks
- Create the todo detail app
-
Similar to
Next, add the code for thePrevbutton. - Update the code to solve the "rotation problem"
- Add a landscape view; Run and check for state changes in both views
- Add a landscape view; Run and check for state changes in both views
-
Make notes for the following:
: Intent, Extra, Communicating between activities, Static method -
Starting from the
manifestmainactivity, walk-through the code showing your understanding of the design and the implementation of the todo detail use case. How many steps and questions can you write down from the start inmanifestto the view being displayed?-
Manifest defines the main activity which has an
onCreatecallback method -
etc. until
detailclick event. -
Anonymous detail
onCickevent handler -
buttonTodoDetail.setOnClickListener(new View.OnClickListener(){ @Override public void onClick(View v) { /* Note, the child class being called has a static method determining the parameter to be passed to it in the intent object */ Intent intent = TodoDetailActivity.newIntent( TodoActivity.this, mTodoIndex); /* second param requestCode identifies the call as there could be many "intents" */ startActivityForResult(intent, IS_SUCCESS); /* The result will come back through */ onActivityResult(requestCode, resultCode, Intent) method */ } }); - Questions at this point in the walk-through the code:
- What is a static method? and why use it here?
- What is in
newIntent? - Where is the
todoindex stored? - …
-
Next explanation could be an
eventand a similar walk-through theeventhandler in thedetailview checkbox for completed todos - Complete the walk-through; use breakpoints and comment your code
-
Add a new use case to indicate a pending incomplete
todo(similar to checkbox for completed todo) -
Explain
onActivityResult
-
Manifest defines the main activity which has an
A Todo Fragment App
The code for this exercise can be found at: https://github.com/ebbi/todo-fragment-app.git
Todo fragment app : MVC, FragmentManager, FragmentTransaction, Fragment, Inflater, View Objects, callbacks
Fragments
Whilst the Android XML view definition and view objects provide for seperation of the V in MVC, the view remains tightly coupled with the Activity class. This is problematic in principle. The V in MVC needs to be more decoupled and further abstracted so that it could be composed and recomposed as necessary at run time.
It is true that an Activities view may change at run time but the code for the change is inside the activity, hence the tight coupling. To decouple is to abstract the view control code out of the Activity and delegate it to another class. This is achieved in Android with fragments.
A fragment is a controller object that an activity can delegate view management tasks to. The Activity's own view can have a placeholder(s) defined to insert any framgent(s) view. This decoupling allows for views to be dynamically recomposed as the result of device or user requirements and events.
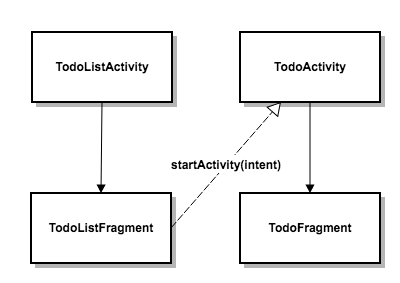
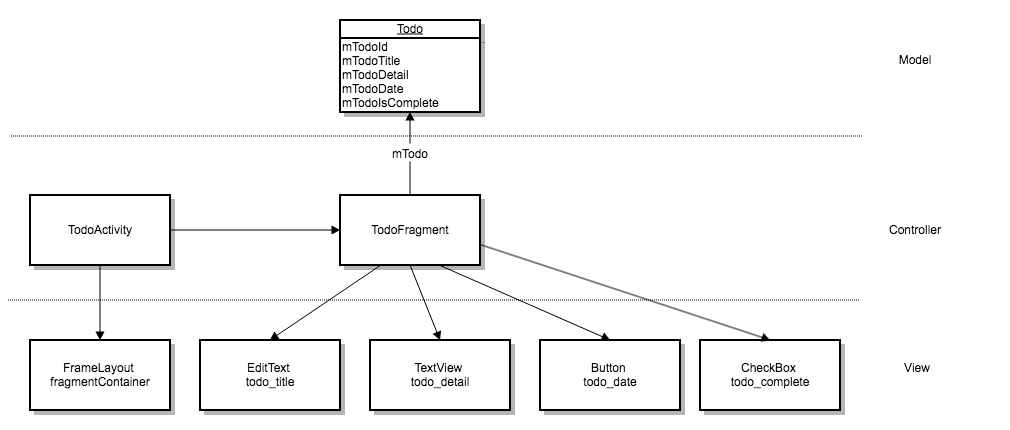
Note in the following class diagram for an example todo fragmnet app:
- Activity provides a view container
- Inflating the view is delegated to a Fragment controller
- The data source for the view is with the Fragment controller (not Activity)
Class diagram — todoFragment app
Create an Android project
In Android Studio: Start a new Android Studio project Application Name:todo-fragment-appCompany Domain:example.com(check theproject nameis at the end of the project location pathname.) Next select the option, Phone and Tablet and from the drop-down list, select: API 27: Android 8.1 (Oreo) Next Select Empty Activity Next change the Activity Name toTodoActivity, keep the defaults Finish Android Studio creates all the necessary files and opens the IDE. Run > Run App Setup or use an existing virtual device, choose Nexus 5X API 27 targeted for Android 8.1 (Google Play) (installing the virtual device may take some time.) Once Android is running, the default 'Hello World!' message is displayed.
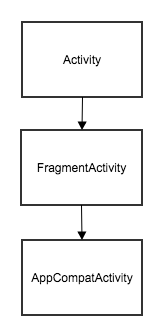
Native Android or Support Libraries?
- Support libraries were created to accommodate for older versions of Android. Google provided
support-v4which includes fragment supportandroid.support.v4.app.Fragment - The single support library is now a group of libraries including:
support-v7, appcompat-v7, recyclerview-v7and many more - Avoid the native Android OS implemetations and use the Support library versions. Many more releases and easier to update.
The following are brief highlights of the important points (the code can be found at: https://github.com/ebbi/todo-fragment-app.git)
Model
Being a controller class, the TodoFragment sits between the model and the view and supports the getter and setter methods for the data in the view.
The model is currently a Plane Old Java Object(POJO) with the getter and setter methods for the data that represents a Todo. See the Todo.java class.
The data source is abstracted to TodoDS java class. Note, the class has:
-
privateconstructor -
public static getmethod to return the same TodoModel object instance (simple implementation of Singleton pattern)
View
Consider the Class diagram
- Activity has an empty container View layout object
- Fragments can be dynamically loaded into the Activity layout
Controller
-
Activity
onCreatehas aFragmentManager -
the
FragmentManagerdynamically loads the fragment views within a fragment transaction -
Fragment
onCreateViewuses theinflatorclass to create the view objects from the XML definitions
Tasks
- Create the todo fragment app (see code: https://github.com/ebbi/todo-fragment-app.git )
-
Starting from the
manifestmainactivity, walk-through the code showing your understanding of the design and the implementation of the todo fragment. How many steps and questions can you write down from the start inmanifestto the view being displayed?- Why use fragments?
- Why a fragment transaction?
-
What does
inflatordo? -
Why
onCreateandonCreateView? - Use the code from todo-detail-app examples; refactor the views to use framgments
-
Incorporate the
TodoModel(currently not used; see the todo-list-app as an example of (non persistant) CRUD operation for creating and updating todos). Implement CRUD operation use cases. - …
A Todo Component App
The code for this exercise can be found at: https://github.com/ebbi/todo-component-app
Todo component app : Vertical and horizontal swipes with RecyclerView and ViewPager, Fragments, Toolbar + Create, Read, Update a todo
RecyclerView
- For scrolling list of elements use RecyclerView
-
Recycles (reuses)
viewobjects to fill a screen -
RecyclerViewrelies on anAdapterwith a typical sequence of calls:getItemCount()- create a new
viewHolderwith a call to the adapter'sonCreateViewHolder() - Adpter looks up model data and fills the list item's
viewHolder view RecyclerViewplaces the list item on the screen- Once enough
viewHolder's have been created to fill the screen, they are reused
RecyclerView and Todo fragments
Create a RecyclerView in the onCreateView method
In TodoListFragment:
private RecyclerView mTodoRecyclerView;

mTodoRecyclerView = (RecyclerView)
    view.findViewById(R.id.todo_recycler_view);
// it will crash without a LayoutManager
mTodoRecyclerView.setLayoutManager(
    new LinearLayoutManager(getActivity()) );
Just like Fragments, RecyclerView has its own view hierarchy
In fragment_todo_list.xml:
<?xml version="1.0" encoding="utf-8"?>
<!-- A RecyclerView with some commonly used attributes -->
<android.support.v7.widget.RecyclerView
    xmlns:android="http://schemas.android.com/apk/res/android"
    android:id="@+id/todo_recycler_view"
    android:scrollbars="vertical"
    android:layout_width="match_parent"
    android:layout_height="match_parent" />
Define the ViewHolder to inflate and fill the layout
In TodoListFragment:

public class TodoHolder extends RecyclerView.ViewHolder
  implements View.OnClickListener {

  public TodoHolder(LayoutInflater inflater, ViewGroup parent) {
      super(inflater.inflate(
          R.layout.list_item_todo, parent, false));
  }
}
Create the Adapter and override three methods
In TodoListFragment:

public class TodoAdapter extends
    RecyclerView.Adapter<TodoListFragment.TodoHolder> {

  private List<Todo> mTodos;

  public TodoAdapter(List<Todo> todos) {
      mTodos = todos;
  }

  @Override
  public TodoListFragment.TodoHolder onCreateViewHolder(
        ViewGroup parent, int viewType) {
    LayoutInflater layoutInflater =
        LayoutInflater.from(getActivity());

    return new TodoHolder(layoutInflater, parent);
  }

  @Override
  public void onBindViewHolder(
      TodoHolder holder, int position) {
    Todo todo = mTodos.get(position);
    holder.bind(todo);
  }

  @Override
  public int getItemCount() {
      return mTodos.size();
  }

}
Bind List Items
Seperating creation and binding allows views to be (Recycled) reused
- The binding starts with the views in the
ViewHolderconstructor -
ViewHolderrelies on abind(data)method to set the values of views it holds.
Tasks
- Create the todo component app
-
Edit the
TodoModelconstructor and increase the loop to 30 test todos. - Run and swipe vertically
- Select a todo and swipe horizontally
- Note + in the toolbar for adding a todo
- Try adding delete
- Improve navigation
A Todo Persistence App
The code for this exercise can be found at: https://github.com/ebbi/todo-persistence-app
SQlite— Create, Read, Update Todo- File store — Implicit intent for camera and picture stored in a file
- Builds on
Todo Fragment AppandTodo Component Appexamples
SQlite — deprecated
From Android Documentation on android.database.sqlite
Caution: Although these APIs are powerful, they are fairly low-level and require a great deal of time and effort to use:
- There is no compile-time verification of raw SQL queries. As your data graph changes, you need to update the affected SQL queries manually. This process can be time consuming and error prone.
- You need to use lots of boilerplate code to convert between SQL queries and data objects.
For these reasons, we highly recommended using the Room Persistence Library as an abstraction layer for accessing information in your app's SQLite databases.
- SQLite, open source flat file relational DB
- Ideal for embedded applications; No DBMS or scalability
- SQLite included in Android standard library
- Android helper classes to open/read/write in device's sandbox
-
Schema, 3rd NF
package database;
import java.util.Date;
import java.util.UUID;
public class TodoDbSchema {
   public static final class TodoTable {
      public static final String NAME = "todos";
      public static final class Cols {
         public static final String UUID = "uuid";
         public static final  String TITLE = "title";
         public static final  String DETAIL = "detail";
         public static final  String DATE = "date";
         public static final  String IS_COMPLETE = "isComplete";
      }
   }
}
/* Columns can be refered to in a Java safe way */ TodoDbSchema.Cols.TITLE -
Building a DB steps:
- (!Exist DB) Create DB (and Seed data)
- Else open DB (and check version)
Android
SQLiteOpenHelperclass handles building a DBpackage database; import android.content.Context; import android.database.sqlite.SQLiteDatabase; import android.database.sqlite.SQLiteOpenHelper; import database.TodoDbSchema.TodoTable; public class TodoBaseHelper extends SQLiteOpenHelper { private static final int VERSION = 1; private static final String DATABASE_NAME = "todo.db"; public TodoBaseHelper(Context context) { super(context, DATABASE_NAME, null, VERSION); } @Override public void onCreate(SQLiteDatabase db) { db.execSQL("create table " + TodoTable.NAME + "(" + TodoTable.Cols.UUID + ", " + TodoTable.Cols.TITLE + ", " + TodoTable.Cols.DETAIL + ", " + TodoTable.Cols.DATE + ", " + TodoTable.Cols.IS_COMPLETE + ")" ); } @Override public void onUpgrade(SQLiteDatabase db, int oldVersion, int newVersion) { } }Example Model using
SQLiteOpenHelperto create a DBpublic class TodoModel { private static TodoModel sTodoModel; private static Context mContext; private SQLiteDatabase mDatabase; public static TodoModel get(Context context) { mContext = context.getApplicationContext(); if (sTodoModel == null) { sTodoModel = new TodoModel(context); } return sTodoModel; } private TodoModel(Context context){ mContext = context.getApplicationContext(); mDatabase = new TodoBaseHelper(mContext) .getWritableDatabase(); } /* insert seed test data */ } ⋮CRUD Operations
-
CRUD uses
ContentValuesclass to store key/value maps/* Model static method for ContentValues */ private static ContentValues getContentValues(Todo todo) { ContentValues contentValues = new ContentValues(); contentValues.put( TodoDbSchema.TodoTable.Cols.UUID, todo.getId().toString()); contentValues.put( TodoDbSchema.TodoTable.Cols.TITLE, todo.getTitle()); contentValues.put( TodoDbSchema.TodoTable.Cols.DETAIL, todo.getDetail()); contentValues.put( TodoDbSchema.TodoTable.Cols.DATE, todo.getDate().getTime()); contentValues.put( TodoDbSchema.TodoTable.Cols.IS_COMPLETE, todo.isComplete()==1 ? 1 : 0); return contentValues; } -
Create or Write to the DB
public void addTodo(Todo todo){ ContentValues contentValues = getContentValues(todo); /* contentValues = null raises an exception except when 2nd parameter is null in which case a new row is inserted */ mDatabase.insert(TodoDbSchema.TodoTable.NAME, null, contentValues); } -
Update a record
public void updateTodo(Todo todo){ String uuidString = todo.getId().toString(); ContentValues contentValues = getContentValues(todo); /* stop sql injection, pass uuidString to new String so, it is treated as string rather than code */ mDatabase.update(TodoDbSchema.TodoTable.NAME, contentValues, TodoDbSchema.TodoTable.Cols.UUID + " = ?", new String[] { uuidString }); } -
Read a record
-
SQLiteDatabase.query()has many overloads corresponding to a SQL query
SELECT columns FROM Table WHERE wherArgs GROUPBY, HAVING, ORDERBY, LIMIT. -
SQLiteDatabase.query()returns acursorobject
Cursor cursor = mDatabase.query(TodoDbSchema.TodoTable.NAME, … ) -
Cursorinterface provides random read-write access to the result set returned by a database query.
cursor.getColumnIndex(TodoDbSchema.TodoTable.Cols.TITLE)); -
DRY by using
CursorWrapperto subclassCursor
public class TodoCursorWrapper extends CursorWrapper { public TodoCursorWrapper(Cursor cursor){ super(cursor); } public Todo getTodo() { String uuidString = getString( getColumnIndex(TodoDbSchema.TodoTable.Cols.UUID)); String title = getString( getColumnIndex(TodoDbSchema.TodoTable.Cols.TITLE)); String detail = getString( getColumnIndex(TodoDbSchema.TodoTable.Cols.DETAIL)); Long date = getLong( getColumnIndex(TodoDbSchema.TodoTable.Cols.DATE)); int isComplete = getInt( getColumnIndex(TodoDbSchema.TodoTable.Cols.IS_COMPLETE)); Todo todo = new Todo(UUID.fromString(uuidString)); todo.setTitle(title); todo.setDetail(detail); todo.setDate(new Date(date)); todo.setComplete(isComplete); return todo; } } -
Generic
select(Read) usingTodoCursorWrapperprivate TodoCursorWrapper queryTodoList( String whereClause, String[] whereArgs) { Cursor cursor = mDatabase.query( TodoDbSchema.TodoTable.NAME, null, whereClause, whereArgs, … ); return new TodoCursorWrapper(cursor); } -
Read a Todo using
TodoCursorWrapperpublic Todo getTodo(UUID id){ TodoCursorWrapper cursor = queryTodoList( TodoDbSchema.TodoTable.Cols.UUID + " = ?", new String[] {id.toString() } ); try { if (cursor.getCount() == 0) { return null; } cursor.moveToFirst(); return cursor.getTodo(); } finally { cursor.close(); } } -
Read a list of Todos using
TodoCursorWrapperpublic List<Todo> getTodoList() { List<Todo> todoList = new ArrayList<>(); TodoCursorWrapper cursor = queryTodoList(null, null); try { cursor.moveToFirst(); while (!cursor.isAfterLast()) { todoList.add(cursor.getTodo()); cursor.moveToNext(); } } finally { cursor.close(); } return todoList; }
-
-
Debugging
-
Changes in DDL should lead to the
SQLiteOpenHelperchange the version number and update the tables in theonUpgrademethod -
Or, destroy the database by deleting the app on the device and start again.
(For a new app,SQLiteOpenHelper.onCreate()is called and a new database instance is created). -
Use a breakpoint and examine the detail of
SQLstatement for correct syntax.
-
Changes in DDL should lead to the
Room Persistence Library
The Room persistence library provides an abstraction layer over SQLite to allow for more robust database access while harnessing the full power of SQLite.
A Todo Persistence App — MVVM
The code for this exercise can be found at: https://github.com/ebbi/TodoMVVM
Model‐View‐View‐Model (MVVM)
MVVM is the Android recommended architecture. This lab exercise is an MVVM implementation of the Todo app.
MVVM overview
MVVM is the Android recommended app architecture built arround a set of Architecture Components designed to work together. The components are lifecycle aware and make code design, implementation and maintenance much easier to manage.
Overview of MVVM components implemented in this exercise
Entity- Annotated class that describes a db table used with
RoomORM class SQLitedatabase- Created and maintained with
Roompersistence library on its own thread DAO- Data Access Object, provides object methods to
SQLqueries Roomdatabase- Uses the
DAOto issue queries to theSQLitedatabase ( and thnkfully, hidesSQLiteOpenHelper) Repository- Provides APIs for UI to communicate with the data layer. Important, Single Source Of Truth (SSOT) pattern, i.e. every data element for the app is stored only once.
Repositoryis also used to manage multiple data sources. ViewModel- A communication object between the data
Repositoryand the UI.ViewModelinstances surviveActivity/Fragmentrecreation. LiveData- An observable data holder class, hence it always holds/caches the latest data and notifies its observers when data changes. UI components observe relevant data as
LiveDatais aware of the relevant lifecycle status changes while observing. - Fragments
- UI is built dynamically with
Fragmenttransactions and seperation of concerns is achieved withViewModelandLiveDataimplementing the observer pattern.
ViewModel allows data to survive accross process rather than Activity lifecycle, hence, configuration changes (such as screen rotations) are easier to manage.
LiveData implements the observer pattern and is an observable data-holder class and a lifecycle aware component. UI Controllers can observe relevant data and LiveData can notify them of data changes. This allows for views to be built only when actual changes to data occurs.
The Room persistency library provides ORM and makes it easy to build a local cache layer, improving performance and the user experience with less reliance on data pulled from the network.
MVVM lab sheet
Create a new project
Create a new empty project named, TodoMVVM
Gradle update for new component libraries
Edit build.gradle (Project: TodoMVVM) and add:
ext {
 roomVersion = '2.2.1'
 archLifecycleVersion = '2.2.0-rc01'
 coreTestingVersion = '2.1.0'
 materialVersion = '1.0.0'
}
Edit build.gradle (Module: TodoMVVM) for dependencies
Sync dependencies
Sync Now (in Android Studio, top right corner)
Do not proceed unless the Sync completes without errors!
Entity
An entity is an annotated class that describes a database table. Room uses the properties of this entity class to create columns in the database table. The same entity is used to instantiate objects from rows of data in the database.
Create a new class file named Todo and insert the following code:
Todo entity
import androidx.annotation.NonNull;
import androidx.room.ColumnInfo;
import androidx.room.Entity;
import androidx.room.PrimaryKey;
@Entity(tableName = "todo_table")
public class Todo {
@PrimaryKey
@NonNull
@ColumnInfo(name = "title")
private String mTitle;
private String mDetail;
public Todo(@NonNull String title) {
this.mTitle = title;
}
public String getTitle() {
return this.mTitle;
}
String getDetail() {
return this.mDetail;
}
void setDetail(String mDetail) {
this.mDetail = mDetail;
}
}The class is a POJO with a set of attributes representing the database columns and getter, setter methods. Note the annotations identify how each part of this class relates to an entry in the database. Room uses this information to generate code.
Here is a brief explanation of each of the annotations
@Entity(tableName = "todo_table")- Each
@Entityclass represents a SQLite table. The parametertablenamecan optionally set a different name than the default name of the class. @PrimaryKey- Every entity has a primary key. In this case, simply each todo
tittleis the primary key. @NonNull- Denotes that a parameter, field, or method return value can never be null.
@ColumnInfo(name = "title")- Specify the name of the column in the table if you want it to be different from the name of the member variable.
- Other minimum costraints
- Every field that is stored in the database needs to be either public or have a getter method. This example provides a
getTitle()andgetDetail()methods.
The complete list of annotations can be found in the Room package summary reference. And see Defining data using Room entities for further examples uses of annotations.
API and dependancies are now setup, Run to make sure there are no errors

Create a git branch, entity
add code for Todo
Git checkout master and merge entity branch

Create a git branch, dao
add code for TodoDao
Git checkout master and merge entity branch

Create a git branch, room
add code for TodoRoomDatabase
Git checkout master and merge room branch
Room Persistence Library
The Room persistence library provides an abstraction layer over SQLite to allow for more robust database access while harnessing the full power of SQLite.
Java Review
Start here!
The Introduction to Programming in Java is a good concise reference. See the lecture notes and complete the exercises. This is a minimum needed before attempting to code in any framework such as Android.
can you explain static types and methods?
if (true) {
   continue to lab exercises
} else {
   Read Introduction to Programming in Java ‐ from MIT
   Watch Java Memory Management, video from Virtual Pair Programmers
   Think Java is a good online reference book
   Use the android and stackoverflow search in the header
}
Threads and Synchronisation
-
Threadis a sequence of instructions that can be managed independantly by a scheduler - Independantly schedulling threads allows for one thread, for example, downloading data while another thread runs the view of an app
- Thread safe classes and synchronisation becomes important
-
Threads a Hello World exampleRunnable Interface- Single method,
public voidwith no arguments
public void run()
Hello (on a
Thread) World (on anotherThread)public class ThreadDemo { public static void main(String args[]) { System.out.println("Hello (on a thread) World (on another thread)!"); /* annoymous class implementing Runnable interface run() method passed to Runnable */ Runnable objHello = new Runnable() { public void run() { for(int i=1; i<=5; i++) { System.out.println("Hello "); /* do some nice processing! */ try { Thread.sleep(1000); } catch(Exception e){} } } }; Runnable objWorld = new Runnable() { /* annoymous class with run() method passed to Runnable */ public void run() { for(int i=1; i<=5; i++) { System.out.println("World"); try { Thread.sleep(3000); } catch(Exception e){} } } }; Thread threadHello = new Thread(objHello); Thread threadWorld = new Thread(objWorld); threadHello.start(); try { Thread.sleep(1000); } catch(Exception e){} threadWorld.start(); // System.out.println(threadHello.isAlive()); // try { threadHello.sleep(1000); } catch(Exception e){} /* .join will force the calling thread to wait until it complete */ // try { threadHello.join(); } catch(Exception e){} // try { threadWorld.join(); } catch(Exception e){} /* check if method is alive after join */ System.out.println(threadHello.getName() + " " + threadHello.isAlive()); System.out.println(threadWorld.getName() + " " + threadWorld.isAlive()); System.out.println("Time for poetry"); } } - Single method,
-
Threads a Hello World Synchronised exampleRunnable Interface- Single method,
public voidwith no arguments
public void run()
DoWork class to simulate load in a
Threadclass DoWork { /* Class to run in a thread Simulate the load by the number of calls to increment */ int count; /* needs to be synchronized and made thread safe */ public synchronized void increment() { count++; // increment is more than one operation! } }Synchronised Hello World
public class SyncDemo { public static void main(String args[]) { System.out.println("Synchronised value from both Hello and World threads"); DoWork doWork = new DoWork(); /* annoymous class implementing Runnable interface run() method passed to Runnable */ Runnable objHello = new Runnable() { public void run() { for(int i=1; i<=1000; i++) { doWork.increment(); } System.out.println( doWork.count + " Hello "); } }; Runnable objWorld = new Runnable() { public void run() { for(int i=1; i<=1000; i++) { doWork.increment(); } System.out.println( doWork.count + " World "); } }; Thread threadHello = new Thread(objHello); Thread threadWorld = new Thread(objWorld); threadHello.start(); threadWorld.start(); /* .join will force the calling thread to wait until it complete */ // try { threadHello.join(); } catch(Exception e){} // try { threadWorld.join(); } catch(Exception e){} System.out.println(doWork.count + " reminders for poetry"); } } - Single method,
Git Overview
It is worth while investing time to know git; version control and collaboration is essential.
Setup a Github or Bitbucket repository
Use an existing account to signin OR create a new account on Github or Bitbucket.
(Note: You must complete the account creation by email verification.)
Once signed in to the remote repo (Github or Bitbucket), creat a new repository. (for the Repository name, use the project name) and leave the rest as default.
Once the remote repository is created, instructions to add this remote repository (or origin) to the local git repository is displayed.
echo "# insert name of the project" >> README.md
git init
git add .
git commit -am "first commit"
git remote add origin (insert the repo address)
git push -u origin master

Note: repo address is similar to:
   https://github.com/you!/your_project_name!.git
An example workflow
A typical workflow to create a branch, try changes, and either delete or merge the changes
Create a new empty folder. Use a terminal and change directory (cd) to the folder. Edit a test file with a message, "Hello World" and save it.
git init
git status
git add .
git commit -am "initial setup"
git status
git log

git branch xyz
git checkout xyz
git status
git log
Edit the test file and add a message "Happy World!" and also duplicate the file
To reverse the changes:
git add .
git reset --hard HEAD

git status
Note the change have been reversed.
To commit the changes and merge it to the master branch:
git status
git add .
git commit -am "added happy and duplicated test file"

git checkout master
git merge xyz

git status
git log
Note, status and log are for information only.
git branch ‐ lists all branches
git push origin master ‐ copies the current master to the remote repo
Prerequisites for Mobile Apps
Java Language and Memory Management
Activity and Intent
Activity and Intent
Activity
Intent
Sequence Diagram — Todo App
How to organise intents?
Events and Listeners
-
Events, Listeners and Callbacks
-
An event listener is an
interfacein theViewclass that contains a single callback method - Android maintains and even queue and implements event listeners
-
Event listener / Callback method:
View.OnClickListener onClick() View.OnLongClickListener onLongClick() View.OnFocusChangeListener OnFocusChangeListener View.OnKeyListener OnKeyListener() View.OnTouchListener OnTouchListener() View.OnCreateContextMenuListener OnCreateContextMenuListener() -
UI click event, the listener,
View.onClickListenerfires an event that results in the corresponding event handler,onClickcall back method being called.
-
An event listener is an
-
Register event listeners with event handlers
Listener defined as an annonymous inner class
-
Activity
privatedata conveniently available to anonymous inner class -
Seperate
listenerfor eachviewobject
buttonNext.setOnClickListener(new View.OnClickListener(){
  @Override
  public void onClick(View v) {
    // do something when the button is clicked
  }
});
Implement the
interfacein the class definitionpublic class ActivityMain extends Activity implements View.OnClickListener { protected void onCreate(Bundle savedValues) { … Button button = (Button)findViewById(R.id.next); button.setOnClickListener(this); } @Override public void onClick(View view) { // do something when the button is clicked { … }Anonymous implementation of the
interfacefor any view objects/* Create an anonymous implementation of OnClickListener for all clickable view objects */ private View.OnClickListener mTodoListener = new View.OnClickListener() { public void onClick(View v) { // get the clicked object and do something switch (v.getId() { case R.id.checkBoxIsComplete: default: break; } } };And the usage would be:
CheckBox checkboxIsComplete =
(CheckBox)findViewById(R.id.checkBoxIsComplete);
checkboxIsComplete.setOnClickListener(mTodoListener);
Define the listener in the XML view definition.
- SoC, avoid
with Activity method:/* listener implementation with the method name defined in the view definition */ android:onClick = "onCheckboxIsCompleteClick"public void onCheckboxIsCompleteClick(View view) { … } -
Activity